Wednesday, 1 November 2017

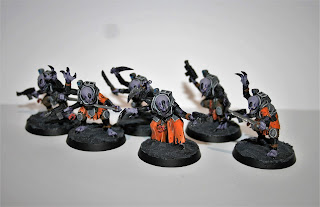
Painting: Genestealer cult: Acolytes Hybrids


Acolytes:

Similar to my Neophytes I wanted to follow this video by GW Duncan https://www.youtube.com/watch?v=AWHtci5sSl4, however I wanted to keep the same uniform as my Neophytes, so I only used it for the flesh 

As ever the colours used were mainly Vallejo game colour unless stated otherwise

So I started by undercoating the models in Halfords Grey primer
Then I painted the cloth with Orange Fire  (72.008). Next I painted the boots, ammo pouches, gun grip and pistol holder with Black. I also painted the trousers with Model color: Tan earth (Model color 70.874)
Next I painted the light with Magic blue (72.021), then the grenade shaft with cam. Olive green (Model colour 70.894)
Next I painted the grenade fuse, boot clips, metal pads on gloves, knife blade, gun barrel & magazine Gunmetal: (72.054).
I painted the knife fastening piece with Chainmail silver (72.053)
The ropes around the limbs and knifes were painted with Beasty brown. (72.043)
Then I liberally applied AP strong tone all over except the areas of flesh. While the AP dried I carefully painted the flesh GW Daemonette Hide, then AP purple wash, then layered GW Slaanesh Grey, I then mixed white with Slaanesh Grey to highlight the facial features. the teeth were painted with Plague brown (72.039) then covered in AP strong tone and the tongue painted with Hexed Lichen (72.015) , then coated with AP dark tone.

Next I highlighted the armour with Stonewall Grey (72.049), going around the edges and carefully going over the armour ridges, as well as a careful highlight on the black areas. I then highlighted the creases in the trousers with Khaki (72.061)

The cultist blades were painted Chainmail (72.053), with Hexed Lichen (72.015) on lumps, then AP Purple wash, then Drybrush chainmail

The edges of the blade were painted with Silver (72.052).
The ropers were painted with Leather brown (72.040)

I painted the GC icons with Bronze (72.057), then applied several coats of AP red tone, waiting for the first to dry before applying the next.

Once the painting was done I used a flathead screwdriver to scoop, and smear GW astrogranite debris over the base. once dry I covered in AP dark tone, then when that dried drybrushed with Stonewall grey, i then painted the rim of the base black.

Summary by section: Undercoat in grey
Flesh
GW Daemonette Hide
AP purple wash
GW Slaanesh Grey layered
GW Slaanesh Grey mixed with white for highlight

Mouth:
Teeth: Plague brown (72.039), AP strong tone
Tongue: Hexed Lichen (72.015), AP dark tone


Eyes
GW foundation yellow


Chitin, gun pouches and rending claws
Black (72.051)

Blade
Gun metal (72.054)
Dark Tone
edge highlighted with silver (72.052)

Cultist blade
Chainmail (72.053)
Hexed Lichen (72.015) on lumps
Purple wash
Drybrush chainmail

Cloth/Top
Fire orange 72.008
AP Dark tone
Highlight with Fire orange mixed with white 2:1

Trousers
Tan earth (Model color 70.874)
AP Dark tone
Highlight with Khaki (72.061)

Armour
Cold Grey 72.050
AP Dark tone
Highlight with Stonewall Grey 72.049

Pounches, pipes, pistol holster, gun grip, gun casing & boots
Black (72.051)
Highlight with Stonewall Grey 72.049

Grenades 
Model color: Camo green 
Gunmetal: (72.054) on the top
AP Dark tone

Gun (Barrel, magazine)
Gunmetal: (72.054)
AP Dark tone
Highlight with Chainmail 72.053

GC icons
Bronze (72.057)
Multiple coats of AP Red wash

Ropes:
Beasty brown (72.043)
AP dark tone
Leather brown (72.040)


Tuesday, 17 October 2017

Painting: Genestealer cult: Neophytes Hybrids


Neophytes: 
I wanted to paint my Neophytes in a similar scheme to that shown by GW's Duncan: https://www.youtube.com/watch?v=CpeAnC1UnaE&t=350s

As ever the colours used were mainly Vallejo game colour unless stated otherwise

So I started by undercoating the models in Halfords Grey primer
Then I painted the cloth with Orange Fire  (72.008). Next I painted the boots, ammo pouches, gun grip and pistol holder with GW Black. I also painted the trousers with Model color: Tan earth (Model color 70.874)
Next I painted the light with Magic blue (72.021), then the grenade shaft with cam. Olive green (Model colour 70.894)

Next I painted the grenade fuse, boot clips, metal pads on gloves, gun barrel & magazine Gunmetal: (72.054).
Then I liberally applied AP strong tone all over except the areas of flesh. While the AP dried I carefully painted the flesh for the 4th Generation Neophytes with Tan (72.066), then washed with Purple tone, once that dried I carefully used Dwarf skin (72.041), then Elf skintone (72.004) and finally for the raised areas i used Pale flesh highlight (72.003)
For 3rd generation I used GW Daemonette Hide, then AP purple wash, then highlighted with GW Slaanesh Grey.

Next I highlighted the armour with Stonewall Grey (72.049), going around the edges and carefully going over the armour ridges, as well as a careful highlight on the black areas. I then highlighted the creases in the trousers with Khaki

I painted the GC icons with Bronze (72.057), then applied several coats of AP red tone, waiting for the first to dry before applying the next.

Once the painting was done I used a flathead screwdriver to scoop, and smear GW astrogranite debris over the base. once dry I covered in AP dark tone, then when that dried drybrushed with Stonewall grey, i then painted the rim of the base black.

Summary by section: Undercoat in grey
Cloth/Top
Orange Fire 72.008
AP Dark tone
Highlight with Orange Fire mixed with dead white 2:1

Trousers
Tan earth (Model color 70.874)
AP Dark tone
Highlight with Khaki (72.061)

Armour
Cold Grey (72.050)
AP Dark tone
Highlight with Stonewall Grey (72.049)

Pounches, pistol holster, gun grip, gun casing & boots
GW Black
Highlight with Stonewall Grey (72.049)

Grenades 
Cam. Olive green (Model colour 70.894)
Gunmetal: (72.054) on the top
AP Dark tone

Gun
Gunmetal: (72.054)
AP Dark tone
Highlight with Chainmail 72.053

GC icons
Bronze (72.057)
Multiple coats of AP Red wash

Blasting charge
Gory/Scarlet red stick
Gunmetal: (72.054) on the top
Beasty Brown (72.043) on binding rope & fuse
AP Dark tone
Highlight binding rope with Leather brown (72.040)

Light
Magic blue (72.021)

Ropes:
Beasty brown (72.043)
AP dark tone
Leather brown (72.040)
4th Gen flesh
Tan (72.066)
Purple wash
Dwarf skin (72.041)
Elf skintone (72.004)
Pale flesh highlight (72.003)

3rd Gen flesh
GW Daemonette Hide
AP purple wash
GW Slaanesh Grey

Chitin
Black (72.051)

Seismic cannon
I used a similar technique that I used on my Dropzone commander Shaltari:
GW White
Bonewhite (72.034)
AP strong tone
Dead White (72.002)

Mining laser:
casing:
GW Foundation paint: yellow
Sun yellow: (72.006)
AP dark tone
then streaks for AP strong tone

Laser:
Model color Gun metal
AP dark tone

Laser "light"
Gory red (72.011)
Bloody red (72.010)
Hot orange (72.009)

I also tried muzzle burn on the mining laser
https://www.youtube.com/watch?v=jIKEfVoqC5U


Tuesday, 23 May 2017

Quick wargaming Terrain: Telephone poles

With the warm summer days we purchased some ice lollies from Tesco called Helter-skelters (£1 for 5), and these lollies unusually had what appeared to be dowel rods for the sticks.
So after consumption and a quick wipe down I put them to use.
I have a few ideas but the first is a telephone pole
I measured out 45mm, marked it on the rod and using a "junior hacksaw" I cut it off.
I then used my glue gun, sticking the 45mm piece on top. I then glued the long piece down to a small piece of MDF (in this case a flames of war command base).
There you have it, one telephone pole.


Size comparison

Tuesday, 18 April 2017

Quick wargaming Terrain: Quick Ruins


In this post I will go through how I have made quick generic ruins suitable for various games including frostgrave & Bolt Action.

I started with an empty box of dishwasher tablets.


With a pair of scissors I cut out "ruin" shapes, and some window holes.

There you have it 4 ruins in less than 10 minutes, that's a result if you ask me! These could be used as they are on the tabletop straight away but I wanted to add a little more depth.


So, using a glue gun I glued the card to 2mm PVC sheet that had been cut to size. I then cut the ends of "lolly sticks" and snapped them in half to get a broken/jaggered effect, then glued them down using the glue gun. I also added small pieces of balsa wood as window ledges.

I then sprayed the ruins black, then sprayed them grey.


I painted the wood with Besty Brown (72.043).
I applied PVA to various points and added large ballast, I then spinkled small ballast over the piles.


The wood was washed with Army painter Strong tone.
Areas where the Besty Brown had spread over were touched up with Cold Grey


There you have it, simple card ruins suitable for various systems

Tuesday, 14 February 2017

Miniatures: Bolt Action - Soviet BA-64


I'm still struggling to get back into the swing of posting blog updates, but I feel this one is required to aid my fellow wargamers!

So I'll be looking at the Soviet BA-64 armoured car for Bolt action 

The model

The model consists of 8 parts: 1 Resin vehicle, 1 resin turret, 4 metal wheels, 1 MMG, 1 light with the optional extra of a crew member with a selection of arms.

The detail on these parts are as good as you'd expect for an armoured car (lets be honest they aren't exactly ornate), and typical for Warlord.

Building of the model

The resin model had some flash that needed to be trimmed and cut, especially on the wheel nubs, but once that was removed and the metal flash had been trimmed, it all went together nicely.

The issue I had was the pieces below, the part on the left was clearly the MMG, however the piece on the right stumped me for ages. It looked like a small MMG like I had when I built my T34s, but I couldn't work out where it went. After several searches I realised that it is the light! so my wargaming friends, if you're as unaware as I am about parts I can tell you this is a light.

There is a small hole on the main chassis for this to go into, but it wasn't quite deep enough so I had to drill it to allow the light to fit.


The metal wheels have indents in them that fit nubs on the chassis.

I found the MMG frustrating to place, as it kept falling to one side, so it was a case of holding it in place while the glue dried.

I didn't glue the turret so it could be removed during the game.

The crew member that came with the model seemed oversized to me, so I didn't use him.


There we have it, one BA-64 ready to roll out onto the battlefield.


Thursday, 26 January 2017

Painting: Ancient British Warriors

So when I started painting these I found the concept of tartan or other traditional "Celt" colours a little daunting and as these were going to be used more for Frostgrave or other non-Hail Caesar games I decided to go with plain colours.

I have since watched the new "Asterix" film (with my 6yo honest) and feel inspired to try another techniques, so watch this space...in the mean time the below is how I painted what I did.

As ever the colours used were mainly Vallejo game colour unless stated otherwise


Flesh
Dark fleshtone (72.044) all over
Tan (72.066), on raised areas
Dwarf Skin (72.041) over most of the Tan areas

Hair
Brown
Earth 72.062
Strong tone

Bestial brown 72.043
Strong tone

Grey
Cold grey 72.050
Dark tone

Ginger
GW foundation paint Macharius solar orange
Orange fire 72.008
Strong tone

Blonde
GW foundation paint Iyanden darksun
Gold yellow 72.007
Soft tone

Spear shaft
Plague brown 72.039
Strong tone

Earth 72.062
Strong tone

Leather: Shoes, Belt etc
Charred Brown 72.045
AP Dark Tone
Bestial Brown 72.043

Swords & spear heads
Chainmail 72.053
GW Wash: Nuln oil
Drybrush: Silver 72.052


Jewelry (Gold technique was used for the horn)
Bronze 72.057
GW Wash: Nuln oil

Gold
GW Wash: Nuln oil
Drybrush: Silver 72.052

Bases
The bases were covered in PVA then sand was liberally added, once dry the sand was painted with Black (72.051), then Charred Brown (72.045) and then static grass was applied.

Trousers
Ultramarine blue 72.022
AP Dark tone
Drybrush: Magic blue 72.021

Trousers
Red base 
Strong tone
Drybrush: Blood red 72.010
Trousers
Camo 72.031
Strong tone
Drybrush: Sick green 72.029

Trousers
British battledress (FoW paint range)
Strong tone
Drybrush: Earth 72.062

Tuesday, 10 January 2017

Dropfleet Commander Kickstarter - the wait is over!

Well I'm back! it's been a long time since I last posted, essentially I decended into a bit of a sulk as I waited for my Dropfleet commander KS pledge to arrive, and although I worked on other projects including: 

  • Imperial Guard Kill team 
  • Horse Archers for Lion rampant
  • Some Ancient Britons to use in Frostgrave 

I didn't feel the urge to write about them, lost in the growing frustration of waiting my KS, as it turned out I was among a handful of orders that got lost and as such had to wait until the new year to receive it.

Don't get me wrong I haven't had to wait for DFC models; my friend Graeme received his pledge as one of the first and as such he gave me his KS "freebies" for the Scourge and Shaltari in exchange for my UCM & PHR Freebies (when I was due to get them). Also in the excitement of DFC shipping I bought a Scourge starter from a friend who backed at the highest pledge level and had enough starter sets to sell one off without issue.

With these models I have played two games, both of which are mediocre, but maybe this was tainted by my anger and frustration of not knowing what was going or when I was going to get my stuff.

Really this post is essentially nothing more than a list of what I got in a hope to invoke the passion for documenting my painting process and general blogging again.


Opened KS box

Sprues for the 2 player starter set: Scourge top, UCM bottom

Shaltari Starter fleet add on

Freebies: 1 cruiser and Frigate sprue for each race.
UCM dog tag and credit at bottom of picture
The thing to note about the models is that they are made from HARD plastic, now the reason I emphasize on the "hard" part is these are unlike any plastic I have ever used.
This is not a plastic to be cut using your old faithful, glue and paint encrusted hobby knife, this plastic requires a new sharp precision knife. I have also found that when cutting the Shaltari from their sprue some of the "spines/transport nodes" snap off.

Flight stands, dice and tape measure
Flight asset add on (fighters,bombers & torpedoes) 

Activation cards add on

Quick reference guides, battlegroup cards, building instructions and flight dial stickers for the "Freebies"

2 player set: Rulebook with vertical sleeve, battlegroup cards, quick reference guides, building instructions, flight dial stickers, cardboard game tokens and two fold out map sheets.
The 2 player set above came all shrink wrapped together which was very helpful; I'm not sure if that was a KS pledge organisation or if the retail 2 player set comes the same way, but I hope for everyone's sake that it does.

Well that will do for now in regards to the DFC KS but I hope to continue with my blog and that it's helpful to you as it is to me.