Showing posts with label KoW. Show all posts

Thursday, 26 January 2017

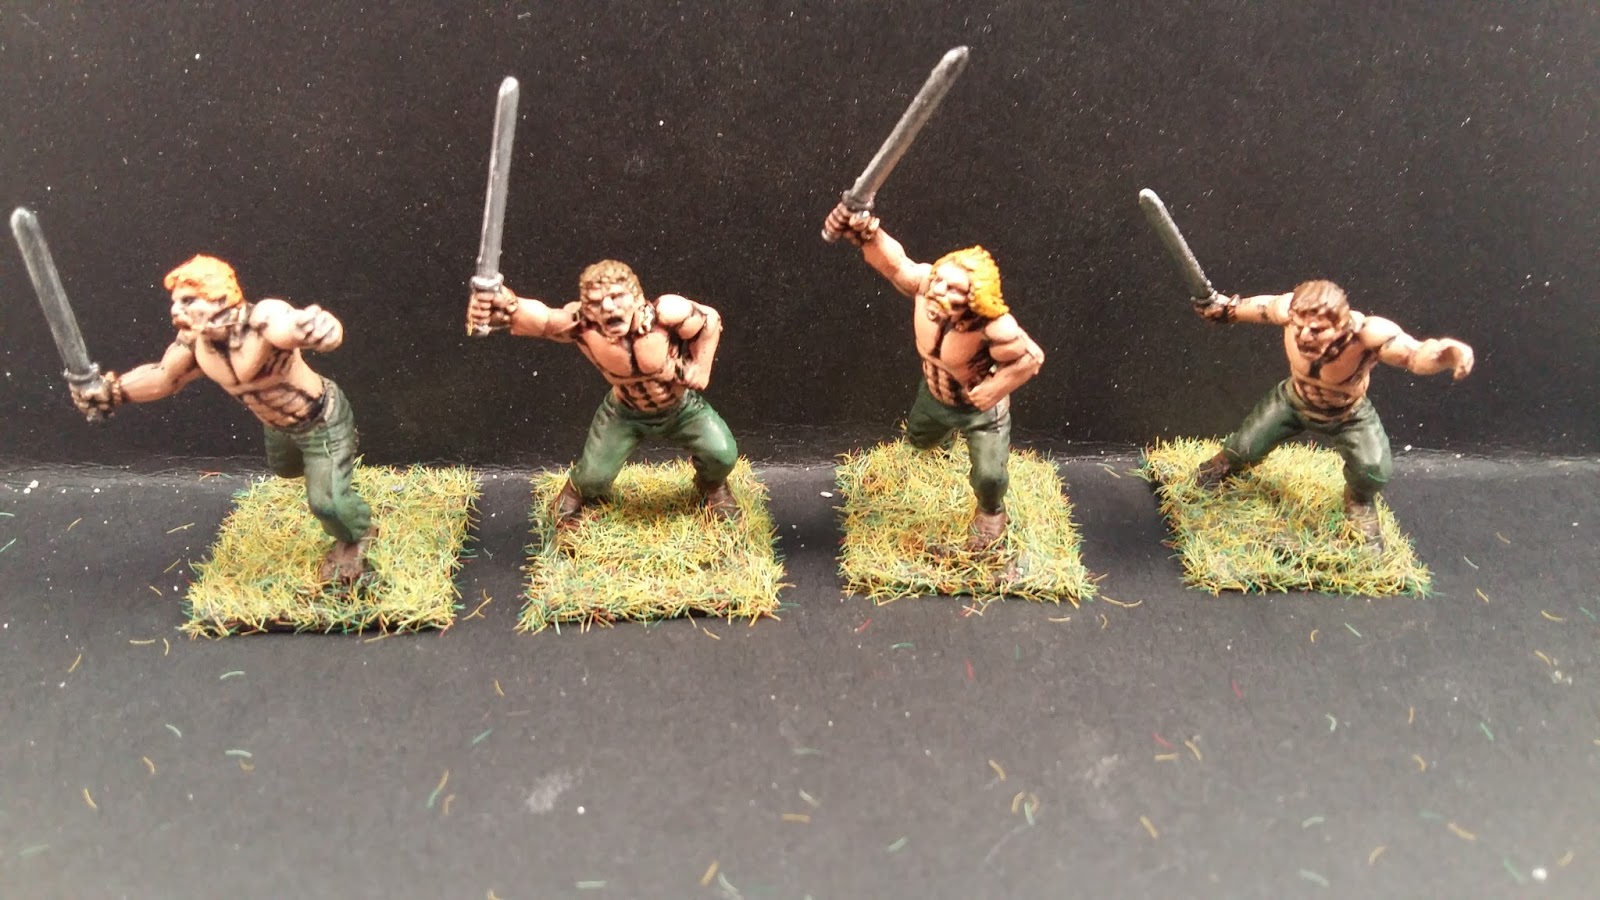
Painting: Ancient British Warriors

So when I started painting these I found the concept of tartan or other traditional "Celt" colours a little daunting and as these were going to be used more for Frostgrave or other non-Hail Caesar games I decided to go with plain colours.

I have since watched the new "Asterix" film (with my 6yo honest) and feel inspired to try another techniques, so watch this space...in the mean time the below is how I painted what I did.

As ever the colours used were mainly Vallejo game colour unless stated otherwise


Flesh
Dark fleshtone (72.044) all over
Tan (72.066), on raised areas
Dwarf Skin (72.041) over most of the Tan areas

Hair
Brown
Earth 72.062
Strong tone

Bestial brown 72.043
Strong tone

Grey
Cold grey 72.050
Dark tone

Ginger
GW foundation paint Macharius solar orange
Orange fire 72.008
Strong tone

Blonde
GW foundation paint Iyanden darksun
Gold yellow 72.007
Soft tone

Spear shaft
Plague brown 72.039
Strong tone

Earth 72.062
Strong tone

Leather: Shoes, Belt etc
Charred Brown 72.045
AP Dark Tone
Bestial Brown 72.043

Swords & spear heads
Chainmail 72.053
GW Wash: Nuln oil
Drybrush: Silver 72.052


Jewelry (Gold technique was used for the horn)
Bronze 72.057
GW Wash: Nuln oil

Gold
GW Wash: Nuln oil
Drybrush: Silver 72.052

Bases
The bases were covered in PVA then sand was liberally added, once dry the sand was painted with Black (72.051), then Charred Brown (72.045) and then static grass was applied.

Trousers
Ultramarine blue 72.022
AP Dark tone
Drybrush: Magic blue 72.021

Trousers
Red base 
Strong tone
Drybrush: Blood red 72.010
Trousers
Camo 72.031
Strong tone
Drybrush: Sick green 72.029

Trousers
British battledress (FoW paint range)
Strong tone
Drybrush: Earth 72.062

Friday, 20 November 2015

Painting: Lion Rampant - Foot Sergeants

This weeks painting post is for the Billmen from the Perry Miniatures War of the Roses box set which has actually taken me quite some time, I think it because I used a multiple wash process, but I feel it's paid off.

As ever all paints used are Vallejo unless otherwise stated

I started with basing them on 20mm Renedra bases, then covered the bases with sand, and undercoating in Halfords Matt Black.


 Next the metal armour and Bill heads were painted with gunmetal (72.054)


 Then I painted the leather armour, belts, some shoes, hair and bags Beasty Brown (72.043)


In this picture you'll see that I painted the flesh with Bronze Fleshtone (72.036), and the cloth with Enscorpena Green (72.032). I painted the cloth green so that when I use them for my KoW KoM they work as a filter army for my undead - all based around the fluff in the KoW rulebook.


I then tidied up the models using Abaddon Black (GW) for the black sections and liberally applied Dark tone (Army Painter) all over. This is unusual for me to apply the tone before I've finished painting but I wanted to try something different.


Once the dark tone was dry I drybrushed the flesh with Elf Flesh (GW), and painted the metal areas with Chainmail Silver (72.053). I then applyied Nuln Oil wash (GW) to the armour and bill heads.

Billmen
Command

Next I applied Leather Brown (72.040) to the leather armour and some shoes, (leaving some shoes beasty brown) these were then drybrushed with Plague Brown (72.039). I painted the belts and bags with Plague Brown (72.039), which was then drybrushed with Bonewhite (72.034). The metal armour was drybrushed with Silver (72.052), as were the studs on the leather armour.

I decided I didn't like the green cloth after all so I painted it in British battledress (Flames of war paint set), washed it with Strong Tone (Army Painter) and then drybrushed with Earth (72.062) when the strong tone was dry.

The bases were then painted with Charred Brown (72.045) and then static grass was applied. After the glue had dried I used Matt Varnish (70.520)

There we are; 2 foot sergeants/Billmen ready for battle.

In the pictures below I have laid them out according to relevant game system:

KoW - Regiment of Billmen for KoM

Lion Rampant - Foot Sergeants


Friday, 6 November 2015

Painting: Pike & Shotte/Pikemans Lament - English Civil War: Musketeers (Scheme 2)

What follows scheme 1....scheme 2 of course!

So like scheme 1 below is a basic overview on the scheme, originally described in my Firelock storming party post. I will go into more details in this post as to how it was applied and what paints were used, most of which were from the Vallejo Game color range, unless otherwise stated.

Scheme 2
Undercoat British Battle Dress (Bolt Action - Warlord spray)
Straps: Leather
Flesh: bronzed flesh
Metals: Gun metal
Gun stock: Bestial Brown
Boots: Bestial Brown or Black or Leather or left as undercoat
Wash with AP strong tone


So I started with an undercoat of British Battle Dress (Bolt Action - Warlord spray), then painted the skin in Bronze Fleshtone (72.036), as you can see its rather messy but I won't worry about that at this time.


Next I painted the guns, bags, powder holders, boots, hair etc Beasty Brown (72.043), then painted Leather Brown (72.040) on some of the boots, some hair, and all of the bags, powder holders etc.


Then I used Abaddon Black (GW) on the gun barrels, boots and hair. Then Gunmetal (72.054) was applied to the gun barrels.


In this picture I'm showing the different hair colours, I've already described the browns and blacks used above, the other colours are Cold Grey (72.050) and Hot Orange (72.009)


The collars and cuffs were painted Ceramite White (GW), then the models were tidied up. The coats and trousers were tidied up using British Battle dress from a Flames of War paint set. Then Army painter strong tone was liberally applied


Once the strong tone was dry, I drybrushed the coat and trousers with Earth (72.062), the leathers with Plague Brown (72.039) and the flesh with Elf Flesh (GW). I then applied a Matt Varnish (70.520). Next was I covered the base in sand and once dry painted it Charred Brown (72.045) then covered in static grass.

There you have it, like the previous post, 16 musketeers ready for ECW or KoW.

Regiment layout for Kings of War

Thursday, 29 October 2015

Painting: Pike & Shotte/Pikemans Lament - English Civil War: Musketeers (Scheme 1)

I decided it was time to paint something different to Kings of War undead, and thought I've overlooked my "For King and Country" box set for too long. Also by painting up something from that box set I have a painted unit for my Kings of War Kingdom of Men army - Double win.

As some of you may remember (or can easily reference by looking back through my blog posts) I painted my Firelock storming party first and from that I came up with two painting schemes - this was so I could split my army for intro games.

So below is a basic overview on the scheme, originally described in my Firelock storming party post. I will go into more details in this post as to how it was applied and what paints were used, most of which were from the Vallejo Game color range, unless otherwise stated.

Scheme 1
Undercoat: Camo green (Halford)
Straps: Leather
Flesh: Bronzed flesh
Metals: Gun metal
Gun stock: Bestial Brown
Boots: Bestial Brown or Black or Leather
Wash with AP strong tone


So I started with an undercoat of Camo Green Spray from Halfords, then painted the skin in Bronze Fleshtone (72.036), as you can see its rather messy but I won't worry about that at this time.


Next I painted the guns, bags, powder holders, boots, hair, belts and straps with Beasty Brown (72.043), then painted Leather Brown (72.040) on some of the boots, some hair, and all of the bags, powder holders, belts & straps. You'll also notice I found a stand of 3 more, so I quickly got them up to the same stage as the rest.


Then I used Abaddon Black (GW) on the gun barrels, belt buckles, boots, and hair (Left picture). Then Gunmetal (72.054) was applied to the gun barrels, firing locks and belt buckles (Right picture).


In this picture I'm showing the different hair colours I've painted, reflecting the different ages in a musketeer unit. I've already described the browns and blacks used above, the other colours are Cold Grey (72.050) (Darker grey of the two), Stonewall Grey (72.049) (Lighter grey of the two) and Hot Orange (72.009)


The collars and cuffs were painted Ceramite White (GW), then the models were tidied up. The coats and trousers were tidied up using Yellow Olive (72.064). Then Army painter strong tone was liberally applied


Once the strong tone was dry, I drybrushed the coat and trousers with Camouflage Green (72.031), the leathers with Plague Brown (72.039), the musket fuse with Bonewhite (72.034) and the flesh with Elf Flesh (GW). I then applied a Matt Varnish (70.520). Next was I covered the base in sand and once dry painted it Charred Brown (72.045) then covered in static grass.

There you have it 16 musketeers, all ready to fight; Be it during the English Civil War or in the fantasy world of Mantica for the Kingdom of Men (As a unit of arquebusiers). But 16 is such a horrid number for Kings of War (although perfectly legal for a regiment (1/2 unit size +1)) I prefer the whole 20 so 4 more are to be built soon.

Thanks for reading.

Regiment of arquebusiers for KoW

Thursday, 22 October 2015

Miniatures: Pike & Shotte - Ordnance battery

So back in May I bought the Pike & Shotte Ordnance Battery, which has been sitting in my cupboard gather dust until now!

Now I've decided it's time to come out, be built and taken to the fields of war!

The Packaging 
So the box has some great artwork on the front and a great picture on the back of the models built and painted, as well as a list of what's in the box..sort of, we'll come to that later.

The cardboard itself is a little flimsy for the contents as it's packed full of resin and metal.

The resin scenic bases and the barriers are wrapped in bubble wrap and the artillery & crew are split into two blisters: One contains a Saker cannon, the other a Mortar and Demi-Culverin


The Models

The scenic bases are beautiful and highly detailed. However mine came out of the box warped which annoyed me slightly until someone online pointed out that if I dropped them in warm water they would bend into the required position and as it turned out it was better than that: once removed from the hot water the bases flattened.


Saker cannon, crew, master engineer, sentinel and master gunner. The cannon lacks any real detail, other than the wood frame, but then it's a cannon, does it need any? the crew and other models a beautifully detailed.


The same can be said the Demi-Culverin, mortar and crew.

The building of the models


The cannons had the most flash, which in most cases was quickly removed, however there was some more difficult pieces on the holding bar of the wheel, which took a little while to remove (compared to the other bits). But as the models only consisted of four parts they went together quickly and easily.

The mortar fits straight into its scenic base, then two little metal straps are placed over the arms, holding the mortar in place.


The crew and other models had excess metal and flash, but again this was quickly removed. However on some models the part the flash was attached too was a little flimsy so when the flash was removed it bent the part, resulting in a wobbly, rather than straight, item.

I was torn whether to glue the cannons and crew to the scenic bases but I have decided not to for ease of storage. So the crew have been mounted on 20mmx20mm bases.

All in all it took no more than an hour to unpack, clean up and put together. It has made me realise how much I prefer plastic models over metal, as metal chippings cover my desk or ping off across the room. But now I have artillery for my Parliamentarian force or my Kingdom of Men: One box of miniatures, several uses - now that's resourcefulness.

Demi Culverin, mortar and crew on scenic bases

Thursday, 15 October 2015

Painting: Kings of War - Undead: Balefire Catapult

So this post was a little delayed by illness and various other duties. Ever onward, but first a thought that crossed my mind the other day when trying to paint this model.

Painting a miniature is, in most cases, a work of art and you need to be in the right frame of mind to be able to produce art. Occasionally when I have been lacking in motivation I pick up a brush and just start which resolves that; the same cannot be said for painting when in a bad mood. I tried to paint to alleviate the mood I was in but I just made mistakes and more I made the worse my mood got so lesson learnt (after all the years of being in the hobby I really should know better). Just thought I share that

No on with the final part of my Mhorgoth Starter: the Balefire Catapult.

As ever most of the paints used are from the Vallejo Game colour range unless otherwise stated.


I undercoated with Halfords Black primer (Other primers are available), and then lightly applied Bonewhite (72.034) to the bones of the crew and the skull in the catapult.


Next was several coats of Escorpena Green (72.032)


Then was the metals: For the spikes, armour, weapons and crank of the catapult I applied Citadel Foundation: Macharius solar orange then followed this up with drybrushing Chainmail silver (72.053) over the top. The plates, bolts and other metal items where painted with Bright Bronze (72.057) then watered down Foul Green (72.025) was applied to give it a galvanised look. This all done in a "slap-dash" kind of way, creating quite a mess.


Next was the boots, straps and that strange thing on the front of the catapult which I've never seen before on any other catapult but an internet search of the balefire showed it painted leathery so I applied Beasty Brown (72.043) followed by Leather Brown (72.040).


The I painted the rope with Plague Brown (72.039). I also pained up some areas that were missed the stage before


Next was the tidy up stage. as mention above I was a little slap dash so it was needed and took a little time, mainly using Abaddon Black (GW). After which I applied Army Painter Dark Tone all over.


For the final stage I drybrushed the bone and black areas with Dead White (72.001), the cloth/Shields with Livery Green (72.033) the rope with Bonewhite (72.034), and the leather with Plague Brown. (72.039). Finally, for the painting stage, I added a coat of Matt Varnish (70.520).

Next I painted the bases with Charred Brown (72.045), then drybrushed with Plague Brown (72.039), then Bone White (72.034) and added static grass. Followed by glueing the catapult onto two 25mmx50mm cavalry bases to make a 50mmx50mm base.


With my catapult done the Mhorgoth starter set is complete including some giant undead rats (or are they dogs). I now have an undead starter to work through as well as some other models to add to my army. So I'll either be working on them next or one of my many other projects.